Software Installation
Windows
System Requirements
- x86_32+SSE2 or x86_64 CPU architecture
- Minimum 1024x600 screen resolution
- Windows 7, 8, 8.1, 10, 11
- Windows Server 2012, 2012 R2, 2016, 2019 or newer
Installation
Silent Installation (Advanced Windows)
With username and password
Green Backup allows software silent installation and configuration by executing install.exe /S /CONFIGURE=user:password through remote management software.
Background installations should be initiated by running from the installation program directory.
If you make an error with the username/password prompt, you can run
cd "C:\Program Files\Green Backup"; echo "USER`nPASSWORD" | .\backup-tool.exe login prompt
from PowerShell to re-enter the login details. Pay attention to the `n character separating username and password.
Other optional arguments
Disable shortcuts
Green Backup allows you to disable the software shortcuts for the silent installation, by adding command-line argument /SHORTCUT="disable".
For example, if you want to disable shortcuts, you can run the command-line
install.exe /S /CONFIGURE=user:password /SHORTCUT="disable"
Disable tray icon
Green Backup allows you to disable the tray icon for the silent installation, by adding command-line argument /TRAYICON="disable".
Log on backup.delegate service as Local System account
Green Backup allows you to explicitly set backup.delegate service to log on as Local System account for the silent installation, by adding command-line argument /ISLOCALSYSTEM="yes"
Set target login server green Backup allows you to set the target login URL for the Green Backup Server (Auth Role), by adding command-line argument /SERVER="https://example.backup.green".
Set target login server
Green Backup allows you to set the target login URL (Web portal URL provided upon service activation) by adding command-line argument /SERVER="https://example.com"
Service Account
Green Backup automatically creates a Virtual Account (NT SERVICE\backup.delegate) with all necessary permissions to back up files on the PC.
Isolating Green Backup under a Virtual Account is supported on Windows 8.1 or later and Windows Server 2012 R2 or later when that server is not a Domain Controller.
On other machines (e.g. Windows Server 2012 R2 RTM and Domain Controller) the backup service will run as LOCAL SYSTEM by default.
On a Domain Controller running Windows Server 2012 R2 or later, It's advisable to configure a Managed Service Account inside Active Directory for backup service.
This allows you to isolate the backup service permissions in a password-less service account. It's necessary to apply this to the backup.delegate service (but not the backup.elevator service, used for software updates).
Upgrading
The installer will safely remove and upgrade any prior version of Green Backup.
Alternatively, you can uninstall the old version and perform a complete reinstall of the software with the new version.
Silent upgrade (advanced)
You can silently upgrade the software remotely via Green Backup WEB interface or by running install.exe /S via remote management software.
Service account
If you customize backup.delegate service to use any other user account, your changes will be preserved in any future software upgrade.
Uninstal
The software can be uninstalled via "App and features" section in the Windows Control Panel.
During this process, you may be prompted whether you wish to preserve any username/password credentials saved on this computer.
If backup.delegate service was running as NT SERVICE\backup.delegate user, this is stored in C:\Users\backup.delegate\AppData\Roaming\backup-tool\ directory; the path may differ if the service was running as another user account.
It's also possible to remove the saved credentials manually by running disconnect login backup-tool.exe command.
Silent uninstallation
You can silently uninstall Green Backup for Windows by passing the /S command-line argument (ae.g. "C:\Programmi\Green Backup\Uninstall.exe" /S).
If you also want to remove the saved username/password credentials, add this command-line "C:\Program Files\Green Backup\Uninstall.exe" /S /ISDELETECREDENTIAL=yes
macOS
System Requirements
- x86_64 or Apple silicon CPU
- x86_64h is supported
- macOS 10.13 "High Sierra" or later is supported on the latest versions of GREEN Backup 23.5.x
Installation
Open Green Backup 23.8.2.pkg file and follow wizard.
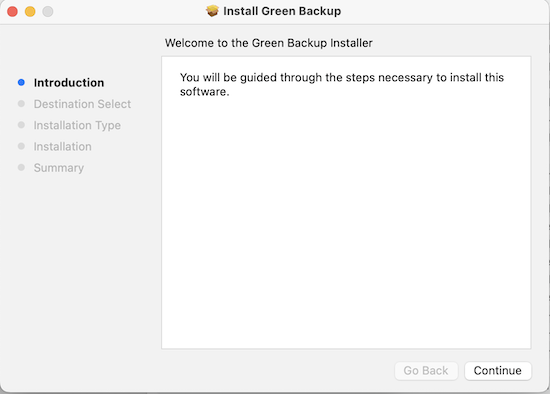
Once installed, the software will prompt for account details to log in.
If you are running the .pkg file from the downloads directory, macOS will offer to move the .pkg file to the Trash after a successful installation.
AUpgrading
The installer will safely remove and upgrade any prior versions of Green Backup.
Alternatively, you can uninstall the old version and perform a complete reinstall of the software with the new version.
Uninstallation
macOS does not have a standard system for uninstalling programs. However, you can still uninstall Green Backup by running the following command from a terminal window:
sudo -u root "/Applications/Green Backup.app/Contents/Resources/uninstall"
This will automatically stop all running Green Backup processes, unregister Green Backup launched services and remove all application files from the disk.
Uninstalling the software preserves any username/password credentials saved on this computer. If you also want to remove the saved username/password credentials, add this command-line: --also-remove-saved-passwords
```sudo -u root "/Applications/Green Backup.app/Contents/Resources/uninstall" --also-remove-saved-passwords``````
In Green Backup 21.9.10 and later, you can also remove the saved credentials manually prior to uninstallation by running this command:
/Applications/Green Backup.app/Contents/MacOS/backup-tool login disconnect
Linux
In order to avoid distribution-specific differences, the package does not automatically start on boot. You should configure your system to run the startup script in /opt/ at boot (e.g. through a systemd unit, an Upstart script, an /etc/init.d/ script, or a line in init.rc).
System Requirements
- CPU: x86_64, or x86_32 with SSE2, or ARM (see below)
- Kernel 2.6.23 or higher
- Supprt for ISRG root X1 certificates for Let's Encrypt
- Unique SSH host keys (Issue that may arise on cloned VMs)
- Dependencies
- bash, xz, GNU awk, and standard GNU/Linux system utilities
- ca-certificates and tzdata (see below)
Note: Graphical interface is available only on x86_64.
ARM CPU support
Green Backup is available for multiple ARM platform variants. During installation, Green Backup installer will automatically select the best available binary version for your device's hardware.
The following variants are supported:
| Platform | Description |
|---|---|
| ARMv8l | ARM 64-bit (Aarch64), no glibc required |
| ARMv7l | ARM 32-bit with vfp, and a glibc-based OS with the "hard-float" ABI (gnueabihf) |
| ARMv6kl | ARM 32-bit with vfp, no glibc required |
Timezone database
Green Backup on Linux requires the OS to provide an up-to-date timezone database, to perform timezone calculation.
- On many Linux distributions, installing the tzdata o timezone package should be sufficient.
- Otherwise, Green Backup will look for a timezone database in all of the following locations:
- /usr/share/zoneinfo
- /usr/share/lib/zoneinfo
- /usr/lib/locale/TZ
CA certificate database
Green Backup on Linux requires the OS to provide an up-to-date set of root certificate authorities, to validate HTTPS / SSL connections
- On many Linux distributions, the ca-certificates package should be sufficient.
- Otherwise, Green Backup will look for a certificate bundle in all of the following locations:
- /etc/ssl/certs/ca-certificates.crt (used by Debian/Ubuntu/Gentoo etc.)
- /etc/pki/tls/certs/ca-bundle.crt (used by Fedora/RHEL 6)
- /etc/ssl/ca-bundle.pem (used by OpenSUSE)
- /etc/pki/tls/cacert.pem (used by OpenELEC)
- /etc/pki/ca-trust/extracted/pem/tls-ca-bundle.pem (used by CentOS/RHEL 7)
Installation
Download and run .run file This is a self-extracting archive, and will need to be executed in an elevated environment.
- Install the software into a branded/opt/greenbackup/ subdirectory.
- It requires an initial username and password.
- Register the current Linux device into that Green Backup account.
- start running Green Backup in background.
If you make a mistake with the username/password prompt, you can run the /opt/green backup/backup-tool login prompt command to re-enter login details.
Linux Installation options
You can control the installer by setting environment variables in your shell before running the .run file
The following options are available:
-
WRITE_INSTALL_LOGSet this to a file path, to record details of the installation. -
OVERRIDE_INSTALL_SERVERSet this to a URL (including http/https e trailing slash) to override the Green Backup server URL used by Green Backup.
You can set an environment variable in bash either on the same line (e.g. WRITE_INSTALL_LOG=install.log ./Green_Backup-xx.x.x.run) or as a separate export command (e.g. export WRITE_INSTALL_LOG=install.log seguito da ./Green_Backup-xx.x.x.run).
Silent installation with username e password
Green Backup allows you to install and configure the software silently. This allows you to remotely push client installations remotely, using your preferred remote management software.
To run the installer silently, run:
export GREEN_BACKUP_USERNAME=xxxx
export GREEN_BACKUP_PASSWORD=xxxx
(echo $GREEN_BACKUP_USERNAME; echo $GREEN_BACKUP_PASSWORD;) | ./Green_Backup-xx.x.x.run
GREEN_BACKUP_USERNAME and GREEN_BACKUP_PASSWORD are the user profile credentials.
You can also silently reconfigure the software using the same pipe syntax:
(echo $GREEN_BACKUP_USERNAME; echo $GREEN_BACKUP_PASSWORD_PASSWORD;) | /opt/Green Backup/backup-tool login prompt
Service restart
The installer creates a backup-daemon-start.sh script that can start the service. The Green Backup agent can be restarted by running the backup-daemon-start.sh script.
In order for Green Backup to start after a system reboot, you must configure this script to be run on system boot.
Different Linux distributions support different methods for running commands on system boot: choose the most appropriate method for your Linux distribution. Some common choices are documented below.
Preserve HOME environment variable
Green Backup uses the $HOME environment variable to find its saved credentials. When configuring Green Backup to start at system boot, ensure that the $HOME environment variable is set (e.g. to /root/) to ensure that Green Backup can find its saved credentials.
If Green Backup is unable to log in, it's possible that your Linux distribution does not set $HOME at this early-boot stage. In that case, you should try running HOME=/root/ /opt/GreenBackup/backup-daemon-start.sh &. Green Backup will automatically try to use /root/ as $HOME directory if $HOME is not already set or if it is set to a blank path.
Note: If you execute the .run installation script as root, this may have different results than if you execute the .run script using an elevated terminal session with 'sudo'.
The 'sudo' command preserves the $HOME variable on Ubuntu; whilst on Debian, the $HOME variable is erased, and sudo then sets it to the home directory of the originating user.
Start in the background
If you are running commands over SSH, please be aware that the backup-daemon-start.sh script runs in the foreground and will die when the SSH session is closed. You can avoid this by running the script in background.
You can run the script in the background (daemonize) by using the backup-daemon-start-background.sh file instead.
You can run the script in the background by using backup-daemon-start-background.sh file.
Startup via rc.local
You can make Green Backup start at system boot by adding an entry to the rc.local file.
First, find the rc.local file on your system:
- /etc/rc.local (Debian/Ubuntu)
- /etc/rc.d/rc.local (CentOS/RHEL)
Add the following content to the rc.local file:
/opt/GreenBackup/backup-daemon-start.sh &
If rc.local file contains an exit 0 statement, the additional command should be added before such a statement.
As of CentOS 7, rc.local file is not executable by default. You should run chmod +x on rc.local file to enable using this method for startup scripts.
Startup via rc.d
You can make Green Backup start at system boot by adding a file to the rc.d directory.
First, find the rc.d directory on your system:
- /usr/local/etc/rc.d (Synology DSM 6.1+)
Add a new file to the rc.d directory with the following content:
#!/bin/bash
/opt/GreenBackup/backup-daemon-start-background.sh
Make the file executable with the following command:
chmod +x /usr/local/etc/rc.d/my-backupgreen-startup-script.sh
Startup via cron
You can make Green Backup start at system boot by adding an entry to root's crontab. Here is how you can do it:
-
Run crontab root in edit mode:
crontab -e -u root -
Add the following line to crontab to run Green Backup at system startup:
@reboot /opt/GreenBackup/backup-daemon-start-background.sh
Startup via systemd
You can use the following example:
[Unit]
Description=Green Backup Client
After=network-online.target

[Service]
Type=simple
RemainAfterExit=true
KillMode=process
User=root
ExecStart=/opt/GreenBackup/backup-daemon-start.sh

[Install]
WantedBy=multi-user.target
This unit file correctly starts the Green Backup service at system boot.
However, the process management in systemd is not fully compatible with the way GreenBackup multi-process model works. In particular, there are compatibility issues with the software updater. Consequently, the above-mentioned unit is
- Unable to leverage process group cleanup;
- Unable to automatically restart the Green Backup agent service;
- After a software update, Green Backup will continue to run, but the unit will remain in "exited" state.
Autostart for graphical desktop application
In the package, the graphical application is not configured to start automatically upon desktop login.
You can add backup-interface --background as a startup command in the desktop environment settings.
Upgrading
The Green Backup version for linux supports software upgrading:
-
The .run file will automatically upgrade the existing version.
-
The software can be remotely upgraded via the Green Backup Server web interface.
Uninstall
To uninstall the Green Backup Linux version you should:
-
Stop all Green Backup processes
-
Remove the relevant subdirectory under /opt/
-
Remove any custom startup scripts
Change password on Linux client
Use the 'Change Password' function in the client web interface
Then fully uninstall and reinstall the client, using the new credential. Your device settings and Protected Items will be preserved.
Graphical desktop application for Linux
By default, the Green Backup application for Linux runs on the command-line only. You can control and configure the application via the web interface.
If you have a graphical Linux desktop environment (e.g. GNOME / KDE / XFCE, using X11 / Wayland), it is optionally possible to run the Green Backup desktop application. In addition to the general Linux system requirements, use of this feature has the following additional requirements:
- CPU x86_64 architecture
- Qt 5.7 or later
- Glibc 2.24 or later
These Qt and Glibc versions are present on most Linux distributions from 2017 or later, such as Ubuntu 17.04 "Zesty Zapus", Debian 9 "Stretch", Fedora 25 Workstation, CentOS 8, and any more recent Linux distribution version.
On Debian/Ubuntu, you may need to install the following package dependencies:
apt-get install libqt5gui5 libqt5svg5
On Fedora/CentOS, you may need to install the following package dependencies:
yum install qt5-qtbase.x86_64 qt5-qtsvg.x86_64
After installing Green Backup for Linux for command-line usage, you can launch the /opt/GreenBackup/backup-interface program.
It is not necessary to launch this program as root; it will communicate with the installed Green Backup background service regardless of what user account it runs as.
Linux NAS (Synology)
Since Green Backup 21.12.6, branded Synology SPKs can be generated and downloaded from the Green Backup Server web interface. The web interface offers two downloads for Synology: one for DSM 6 and one for DSM 7.
Due to Synology packaging rules, these SPKs are not interchangeable.
Installation
DSM 6 only: Installation of packages published by any publisher must be allowed before Green Backup can be installed.
This setting can be enabled from the Package Center;
in Settings > General > Trust Level, select the "Any publisher" radio button and accept the settings.
Installation of Green Backup on a Synology NAS follows the same process as installing any other SPK:
- Open the Package Center.
- If on DSM 6, ensure the settings noted above have been applied.
- Click "Manual Install" in the top right.
- Upload the .spk file downloaded from Green Backup Server.
- If on DSM 7, accept the prompt to allow the installation of a third-party package.
- Accept the license agreement.
- Enter the appropriate Green Backup credentials and user
- If a previous version of Green Backup has been installed on the NAS and its settings were not removed when it was uninstalled, the installer will automatically detect the credentials. Leaving all fields blank will reuse the existing credentials; new credentials can also be entered as usual and will take precedence..
- Click "Apply" to complete the installation.
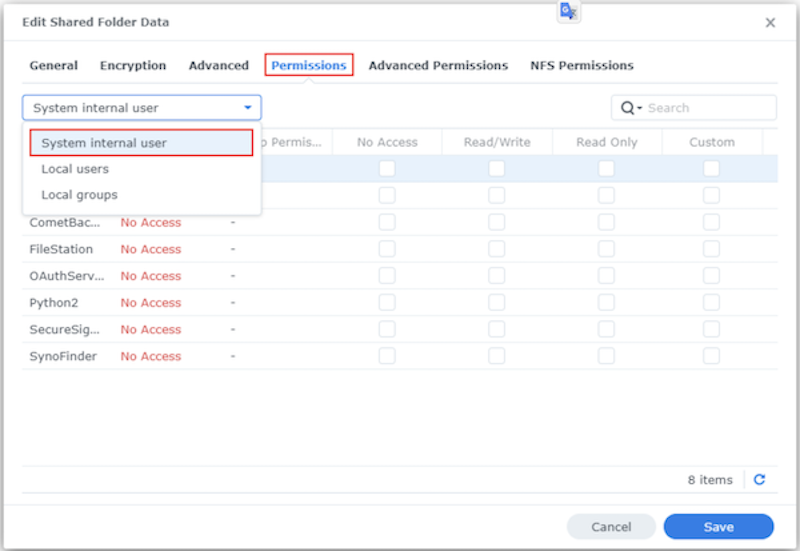
Permissions
On DSM 7, Green Backup runs a special package-specific user named backuptool. In order to perform backups and restores, this user must be granted permissions to access the appropriate Shared Folders. This does not apply to DSM 6.

-
Log in to the Synology NAS
-
Open the Control Panel and go to Shared Folders
-
Select the Shared Folder containing the data to be backed up and click Edit
-
In the Permissions tab, select "System internal user" from the dropdown menu on the left
-
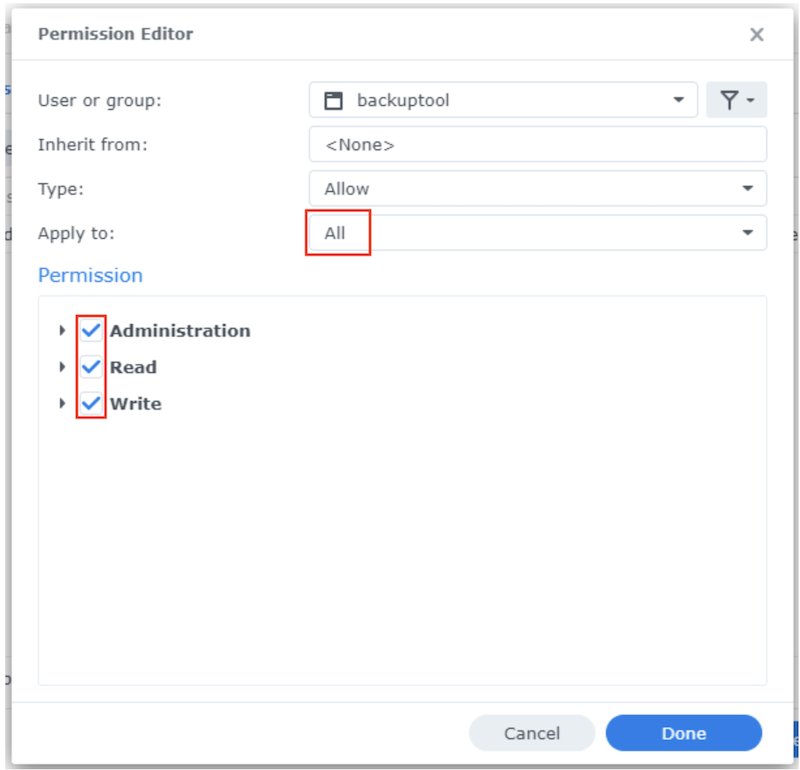
For the user backuptool, click the checkbox in the Custom column.
-
In the dialog that appears, ensure the following:
- "Apply to:" is set to "All"
- All permissions are checked
Limitations
Due to restrictions placed on packages by Synology for DSM 7, Green Backup runs as a special package-specific user, which results in some limitations:
-
Remote upgrade/uninstall is not supported: his is because third-party SPKs are no longer allowed to run as root, which means Green Backup cannot initiate a package upgrade/uninstall from within a package itself..
-
When performing a restore to a Synology NAS, permissions/ownership may not be restored correctly: This is because a package user is not allowed to chown to a user other than themselves.
After installation
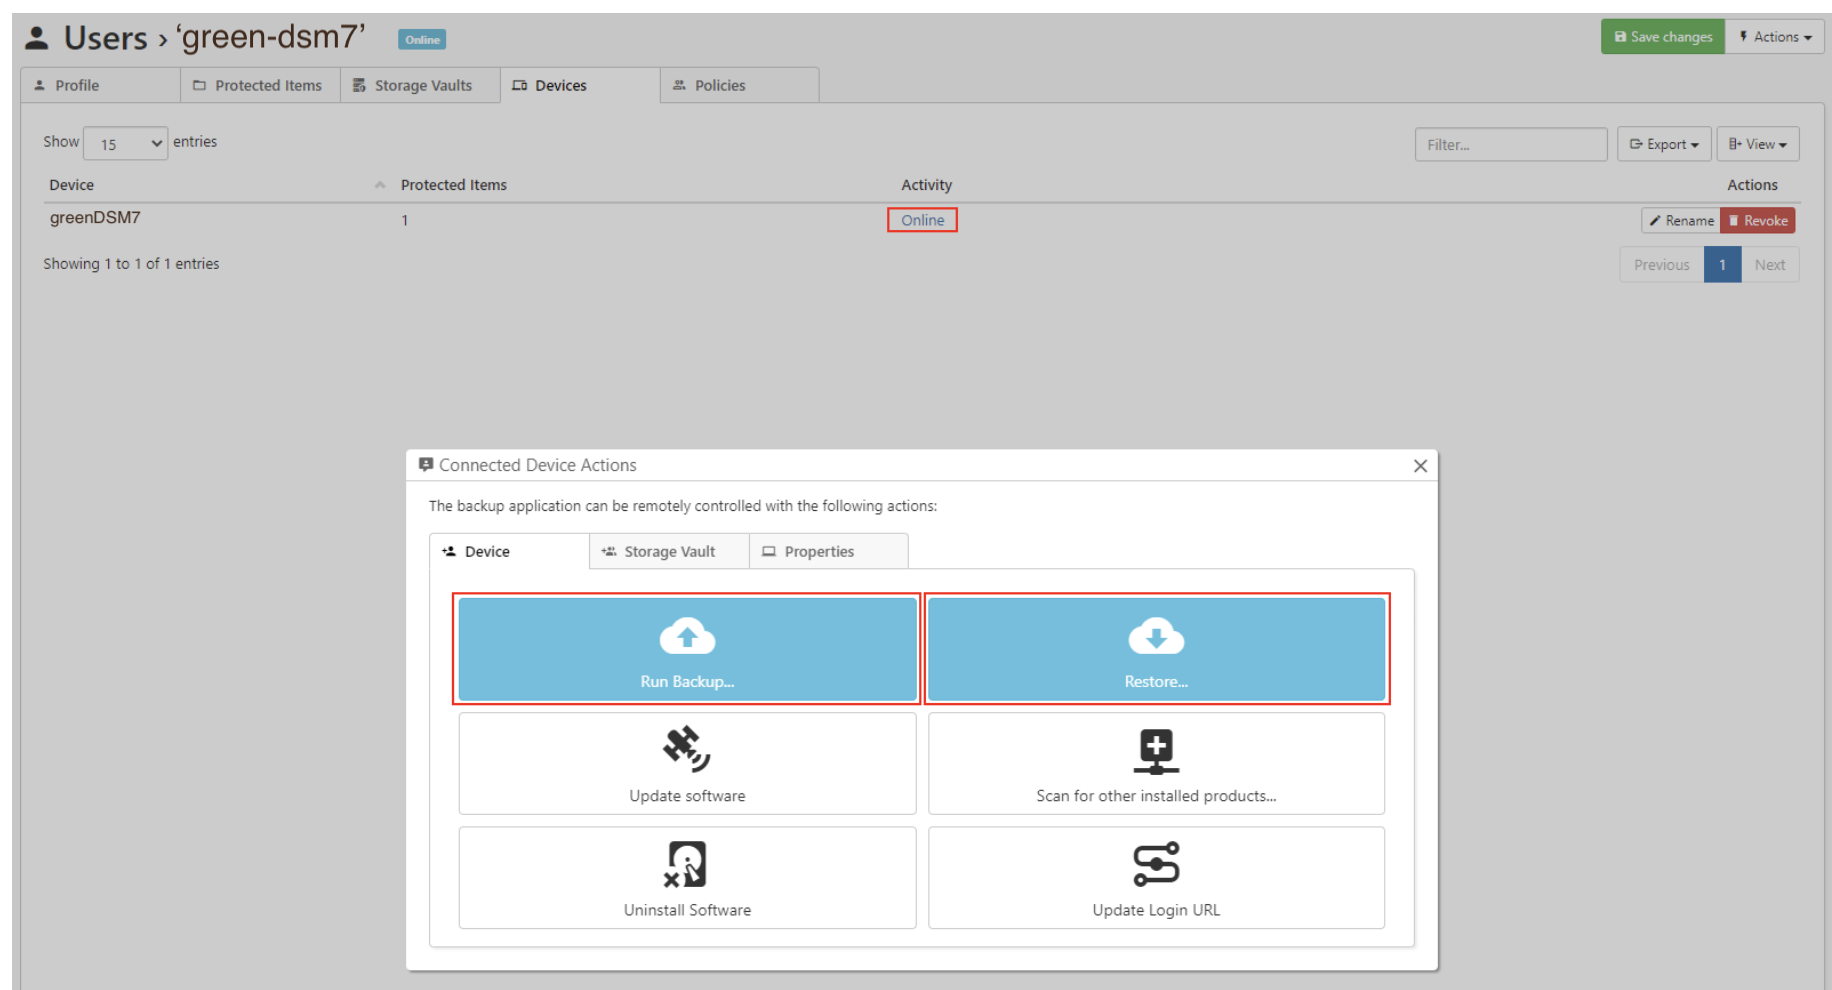
SPK Synology does not provide a graphical client for Green Backup. Creating Protected Items and manually running backups or restores is done from the Green Backup Server web interface.
Creating a Protected Item can be done from the Protected Items tab on the user's page:

Backups and restores can be run by selecting the connection to the online Synology device from the Devices tab on the user's page: